SAML single sign-on
Accessing the Deeper Signals platform through SAML lets your users sign in with your organisation's identity provider (IdP), with optional deep-linked onboarding through playbooks.
:::info What is SAML? Security Assertion Markup Language (SAML) is an open standard that lets an identity provider (IdP) pass authentication assertions to a service provider (SP). In this setup your IdP (Microsoft Entra ID / Azure AD, Google Workspace, Okta, AWS IAM Identity Center, ...) authenticates the user and Deeper Signals is the SP. :::
SAML has to be configured on both sides. The admin app guides you through it under Settings → Integrations → SAML; the steps below mirror that flow. Provider-specific walkthroughs for Microsoft Entra ID and Google Workspace follow the generic steps.
1. Collect your IdP's parameters
In your IdP's admin console, create a SAML application for Deeper Signals and note:
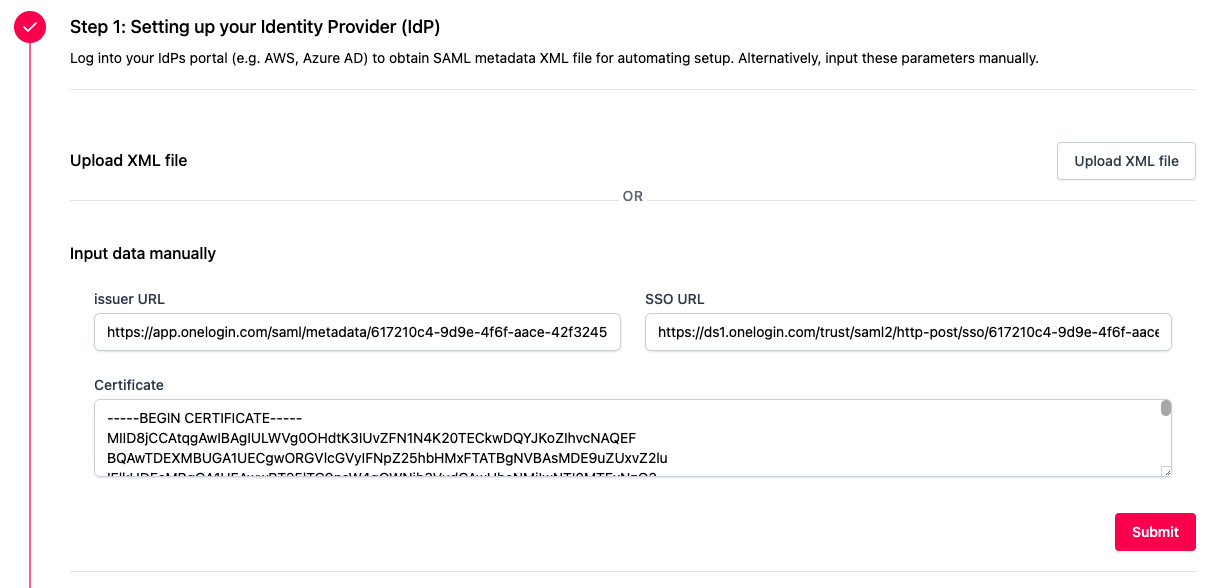
- Issuer URL (Entity ID of the IdP) — a unique identifier formatted as a URL.
- SSO URL — the IdP's sign-in endpoint where authentication starts.
- Signing certificate — the X.509 certificate the IdP signs assertions with.
Configure the NameID to be the user's e-mail address, with this NameID format:
urn:oasis:names:tc:SAML:1.1:nameid-format:emailAddress
Add two attributes to the assertion so the platform can create users with their names:
| Attribute in your IdP | SAML attribute name |
|---|---|
| First name | first_name |
| Last name | last_name |

Enter the three parameters in step 1 of the Deeper Signals SAML setup:
2. Configure Deeper Signals in your IdP
After submitting step 1, step 2 shows the service-provider values to copy back into your IdP:
- Audience / Entity ID — the globally unique name of Deeper Signals as SP (a URL).
- ACS endpoint (URL) — where the IdP posts the SAML response; the user is redirected there after authenticating.
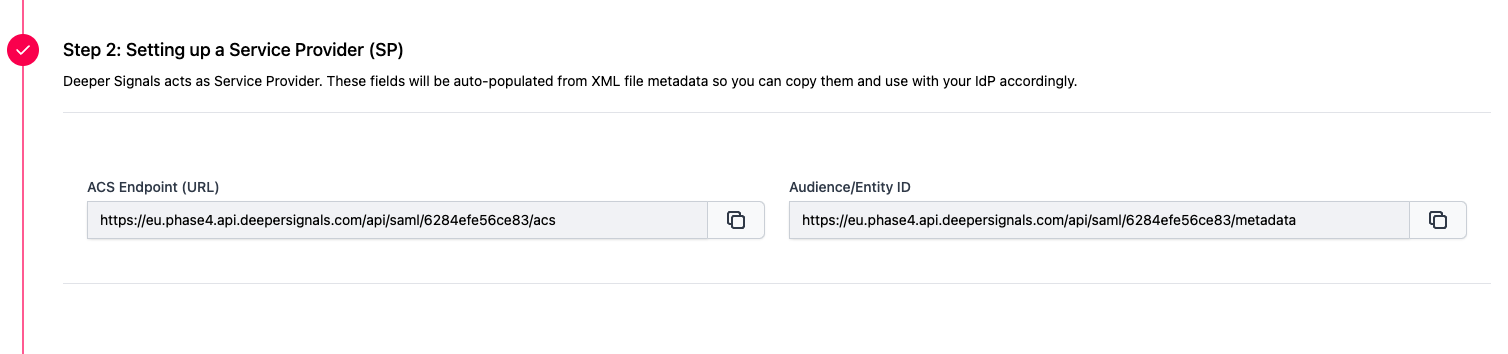
The ACS validator field must be filled in when you use SP-initiated sign-in (users start at a Deeper Signals URL).
Microsoft Entra ID (Azure AD)
- In the Microsoft Entra admin center, open Enterprise applications → New application → Create your own application, choose Integrate any other application you don't find in the gallery (Non-gallery) and name it "Deeper Signals".
- Open the application's Single sign-on page and select SAML.
- Under Basic SAML Configuration enter the values from step 2 of the Deeper Signals setup: Identifier (Entity ID) = Audience / Entity ID, Reply URL (Assertion Consumer Service URL) = ACS endpoint. Leave Sign on URL empty for IdP-initiated sign-in or set it to the ACS validator URL for SP-initiated sign-in.
- Under Attributes & Claims set the Unique User Identifier (Name ID) to
user.mailwith the format Email address, then add two claims with no namespace:first_name=user.givennameandlast_name=user.surname. - Under SAML Certificates download the Certificate (Base64). Under Set up Deeper Signals copy the Login URL (SSO URL) and the Microsoft Entra Identifier (Issuer URL). Enter the three values in step 1 of the Deeper Signals setup.
- Under Users and groups assign the users or groups who may sign in. Test with Test this application or from the My Apps tile.
If users get a "no e-mail address" error, their Entra account has no mail attribute. Use user.userprincipalname as the Name ID source instead, or fill in the mail attribute.
Google Workspace
- In the Google Admin console open Apps → Web and mobile apps → Add app → Add custom SAML app and name it "Deeper Signals".
- On the Google Identity Provider details page copy the SSO URL and Entity ID and download the Certificate. Enter them in step 1 of the Deeper Signals setup.
- On the Service provider details page enter the values from step 2 of the Deeper Signals setup: ACS URL = ACS endpoint, Entity ID = Audience / Entity ID. Set Name ID format to
EMAILand Name ID to Basic Information → Primary email. - Under Attribute mapping add Basic Information → First name →
first_nameand Basic Information → Last name →last_name. - Finish, then open the app's User access panel and turn it ON for everyone (or for the organisational units that should have access). Changes can take up to 24 hours to propagate.
- Test from the Google app launcher (IdP-initiated) or from a Deeper Signals sign-in link (SP-initiated).
3. Optional: playbooks
Playbooks put authenticated users into groups and projects and assign them assessments in one step. Once a playbook exists, two more values appear in the SAML settings:
| Value | Flow | Use |
|---|---|---|
| Relay state | IdP-initiated | Set it as the relay state in your IdP configuration so that every user coming through the IdP tile runs this playbook. |
| Playbook URL | SP-initiated | Distribute this URL to the users who should run this playbook. Use it when different users need different playbooks. |
We recommend configuring a relay state in your IdP, because users should always end up with an assessment assigned. A playbook flagged default_for_login runs when neither value is present.
Provisioning
SAML signs users in and creates them on first login. To keep users in sync when they join or leave your organisation, add SCIM provisioning.